
What is Vaultwarden?
Vaultwarden is a server and a alternative backend for the password manager Bitwarden. While Vaultwarden is used with the Bitwarden clients it does not implement the same feature set as the Bitwarden server. However, the setup is much simpler.
Why did I choose to use Vaultwarden?
There are many different Opensource password manager. The one I used before did its work, but I was never fully satisfied with its GUI. Then I stumbled on Bitwarden and saw the great integration into the systems I use for my daily work. However, the server setup of Bitwarden is a bit of a hassle, and did not work out of the box for me. So I did look for alternatives and found Vaultwarden. With the easy setup and compatibility to the Bitwarden clients, it just fit the bill.
How does a Vaultwarden setup look like?
The Vaultwarden setup is quit simple. Vaultwarden is shipped as a container image. Simply running the container image will setup a running server. And when you only want to run the server in your local network this will suffice. However, if you want to connect to your server from the world wide web, then a more sophisticated setup is needed for a good enough security.
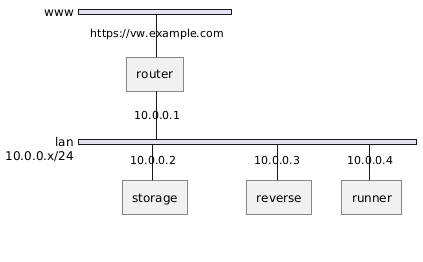
Let’s assume we have a router, a storage server, a reverse proxy and a server on which our container will be running. The container runner is a fedora server with a installed Podman environment. For the reverse server we are using the old and reliable apache web server. To access the storage server we use SSHFS.
We are using Podman because it has a daemonless implementation. This lets us run the container as a specific user and not as root, which brings additional security when the container sandbox is breached. A nice side effect of using different users is that containers belonging to one service are grouped. While working with one service only the containers of this service are visible, which leads to a neat CLI.
Setting up the storage
Because we are using the SSHFS the storage setup is easy. We only have to configure new user and setup the ssh keys. First we generate the ssh key pair on our local pc. When asked for a password do not enter one.
[user@localhost]$ ssh-keygen -f ~/vaultwarden-example -t ed25519 -b 1024After the key pair is generated we create the user and add the public key to the authorized_keys file.
[root@storage]$ useradd -m vaultwarden
[root@storage]$ echo "ssh-ed25519 AAAAC3NzaC1lZDI1NTE5AAAAII+m5Bh9rQ1VqWeF7/xH9mMYF7n7W2YOY70kfrbMIXbU vaultwarden@example.com" >> /home/vaultwarden/.ssh/authorized_keys
At last, we can test the login and create a data directory for the server.
[user@localhost]$ ssh -i ~/vaultwarden-example vaultwarden@storage
[vaultwarden@storage]$ mkdir -p /home/vaultwarden/data
Setting up Vaultwarden
To install the vaultwarden service we first login on the runner server as an administrator. As root we can than install Podman, the SSHFS userstpace driver and create the vaultwarden user. As before the vaultwarden user does not get a password set, instead we add the created public key to the authorized_keys file of the vaultwarden user.
[root@runner]$ dnf install -y podman fuse-sshfs
[root@runner]$ useradd -m vaultwarden
[root@runner]$ echo "ssh-ed25519 AAAAC3NzaC1lZDI1NTE5AAAAII+m5Bh9rQ1VqWeF7/xH9mMYF7n7W2YOY70kfrbMIXbU vaultwarden@example.com" >> /home/vaultwarden/.ssh/authorized_keys
With the vaultwarden user we can than copy the private and public key to the .ssh directory of the vaultwarden user. We need the private key for the automatic mount of the SSH filesystem.
With the keys on the system we can mount the data directory which should be mapped to the container. After the mount was successful, we can start the container with Podman. As shown below we map the port 3012 and 80 to the host system. Be aware that a Podman container run as user can only map to ports above the well-known range. The only network option available is the port mapping. You cannot setup complex network configurations when running containers with non-root privileges.
Additional, to the published ports we set a name for our countainer with --name. And we set the environment variable ADMIN_TOKEN so that we can configure our vaultwarden server. The vaultwarden admin site is reachable under /admin.
To restart the vaultwarden server automatically after each reboot we have to create a systemd service file. Podman comes with a neat tool which does create the systemd service for us. However, before wie run the podman generate command we have to generate the systemd configuration directory.
[user@localhost]$ scp -i ~/vaultwarden-example ~/vaultwarden-example vaultwarden@runner:~/.ssh/id-ed25519
[user@localhost]$ scp -i ~/vaultwarden-example ~/vaultwarden-example.pub vaultwarden@runner:~/.ssh/id-ed25519.pub
[user@localhost]$ ssh -i ~/vaultwarden-example vaultwarden@runner
[vaultwarden@runner]$ mount -t sshfs vaultwarden@storage:/mnt/vaultwarden/data /mnt/vaultwarden/data
[vaultwarden@runner]$ podman run -v /home/vaultwarden/data:/data -e ADMIN_TOKEN="SOME_SUPER_SECRET_PASSWORD" -p 8080:80 -p 3012:3012 --name vaultwarden docker.io/vaultwarden/server:latest
[vaultwarden@runner]$ mkdir -p .config/systemd/user/
[vaultwarden@runner]$ podman generate systemd --name vaultwarden > vaultwarden.service
Podman does not know about our mounted filesystem for this we have to create a systemd mount target. The file name of the systemd mount file hast to be the path separated by '-'. So we create the file /home/vaultwarden/.config/systemd/user/home-vaultwarden-data.mount, and add the content below.
[Unit]
Description=Mount data directory for vaultwarden

[Mount]
What=vaultwarden@storage:/home/vaultwarden/data
Where=/home/vaultwarden/data
Type=sshfs
Options=defaults

[Install]
WantedBy=multi-user.target vaultwarden.service
After that we modify our vaultwarden service file by appending the data directory to the RequiresMountsFor option.
...
RequiresMountsFor=/tmp/podman-run-{uuid}/containers /home/vaultwarden/data
...
At last we can enable the service, and check with a reboot if the systemd service works correctly. Do not forget to enable the linger options for the vaultwarden user. Without the linger options set, the systemd user session will be executed at the first login of the user. However, we do want to run the systemd user session while the system boots.
[vaultwarden@runner]$ systemctl --user enable home-vaultwarden-data.mount
[vaultwarden@runner]$ systemctl --user enable vaultwarden.service
[root@runner]$ firewall-cmd --permanent --add-port 8080/tcp
[root@runner]$ firewall-cmd --permanent --add-port 3012/tcp
[root@runner]$ loginctl enable-linger vaultwarden
[root@runner]$ reboot
Setting up the reverse proxy
Apache configuration
We are using the apache web server as a reverse proxy. Naturally, it is possible to use other web server and proxy implementations.
First we do install the apache web server. There is the meta package httpd on fedora.
[root@reverse]$ dnf install -y httpdAfter that we just add the configuration below to the apache configuration directory. Which is located in /etc/httpd/conf.d.
The configuration below redirects all HTTP requests to HTTPS, for the vw.example.com subdomain. HTTPS request are passed to the runner server. When the reverse proxy and the runner are run on different root server, it may be reasonable to use an ssh tunnel instead of an unencrypted redirect.
<VirtualHost *:80>
        ServerAdmin user@example.com
        ServerName vw.example.com

        RewriteEngine on
        RewriteCond %{SERVER_NAME} =vw.example.com
        RewriteRule ^ https://%{SERVER_NAME}%{REQUEST_URI} [END,NE,R=permanent]
</VirtualHost>

<IfModule mod_ssl.c>
        <VirtualHost _default_:443>
                ServerAdmin user@example.com
                ServerName vw.example.com
                Header always set Strict-Transport-Security "max-age=63072000; includeSubdomains;"

                RewriteEngine on
                RewriteCond %{HTTP:Upgrade} =websocket [NC]
                RewriteRule /notifications/hub(.*) ws://runner:3012/$1 [P,L]
                ProxyPass / http://runner:8888/
                ProxyPreserveHost On
                ProxyRequests Off
                RequestHeader set X-Real-IP %{REMOTE_ADDR}s

                SSLEngine on
                SSLCertificateFile /path/to/fullchain.pem
                SSLCertificateKeyFile /path/to/private.key
        </VirtualHost>
</IfModule>
Finally we can start the web server and open the ports to the world wide web. You should now have a reasonable secure vaultwarden setup. If you want to protect the vaultwarden from brute force attacks. You can additionally install fail2ban, which is described below.
[root@reverse]$ firewall-cmd --permanent --add-service http
[root@reverse]$ firewall-cmd --permanent --add-service https
[root@reverse]$ systemctl enable httpd
[root@reverse]$ systemctl start httpd
Fail2ban
To setup fail2ban we install the packages first. On fedora the packages is shipped with many example and prepared jails and filters. However, we want to run fail2ban on our reverse proxy. So we have to create the filter and jail ourself.
[root@reverse]$ dnf install -y fail2banFor the filter configuration we create a file named apache-vaultwarden.conf in /etc/fail2ban/filter.d. Vaultwarden returns with a 400 status code. So we create a regular expression which looks for the correct domain and the 400 status code.
[INCLUDES]

before = apache-common.conf

[Definition]
failregex = ^<HOST> - .*".*HTTP.*" 400 .*".*vw.example.com.*".*$
After the filter file we create a file named 10-apache-vaultwarden.conf in /etc/fail2ban/jail.d and paste the content below. This file tells fail2ban to search for the above filter in the access log files of the web server. When 5 login attempts fail in a time frame of 10 minutes the offending ip is banned for an hour.
enabled = true
port = http,https
filter = apache-vaultwarden
logpath = %(apache_access_log)s
bantime = 3600
findtime = 600
maxretry = 5
Finally, as with all the other services we have to enable and start fail2ban.
[root@reverse]$ systemctl enable fail2ban
[root@reverse]$ systemctl start fail2ban
Update 2023-12-15
I wrote an ansible role. Just because I can, and I was annoyed always forgetting how to update the container. Howerever, the role is not really finished. Backup and restore of the container are missing. Nevertheless, here you go.